Documentation Index
Fetch the complete documentation index at: https://cometchat-22654f5b-docs-android-v6-beta2.mintlify.app/llms.txt
Use this file to discover all available pages before exploring further.
iOS UI Kit Sample App
Reference implementation of iOS UIKit, APNs and Push Notification Setup.
What this guide covers
- CometChat dashboard setup (enable push, add APNs Device + APNs VoIP providers) with screenshots.
- APNs + PushKit/CallKit wiring (tokens, delegates, CallKit).
- Incoming message/call handling and deep links.
- Badge count and grouped notifications.
- Payload customization and testing.
How APNs + CometChat work together
- APNs is the transport: Apple issues the APNs device/VoIP tokens and delivers the payloads. No FCM bridge is involved.
- CometChat providers: The APNs Device and APNs VoIP providers you add in the CometChat dashboard hold your APNs key/cert. When you call
CometChatNotifications.registerPushToken(..., .APNS_IOS_DEVICE / .APNS_IOS_VOIP, providerId)after login, CometChat binds those tokens to the logged-in user and sends to APNs for you. - Flow: Permission prompt → APNs returns device + VoIP tokens → after
CometChat.login, register both tokens with the matching provider IDs → CometChat sends to APNs → APNs delivers →UNUserNotificationCenterDelegate(andPushKit/CallKitfor VoIP) surface the notification/tap.
1. Enable push and add providers (CometChat Dashboard)
- Go to Notifications → Settings and enable Push Notifications.
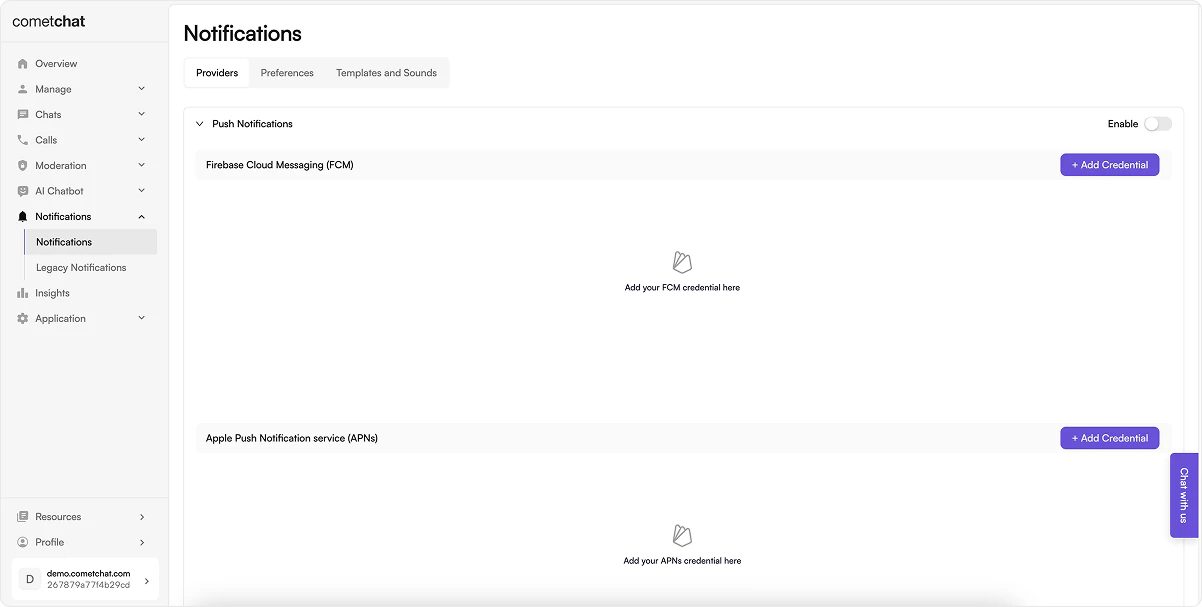
- Click Add Credentials:
- Add an APNs Device provider (alerts) using your
.p8key, Team ID, Key ID, and Bundle ID; copy the Provider ID. - Add an APNs VoIP provider (calls) with the same
.p8(recommended for CallKit reliability); copy the Provider ID.
- Add an APNs Device provider (alerts) using your
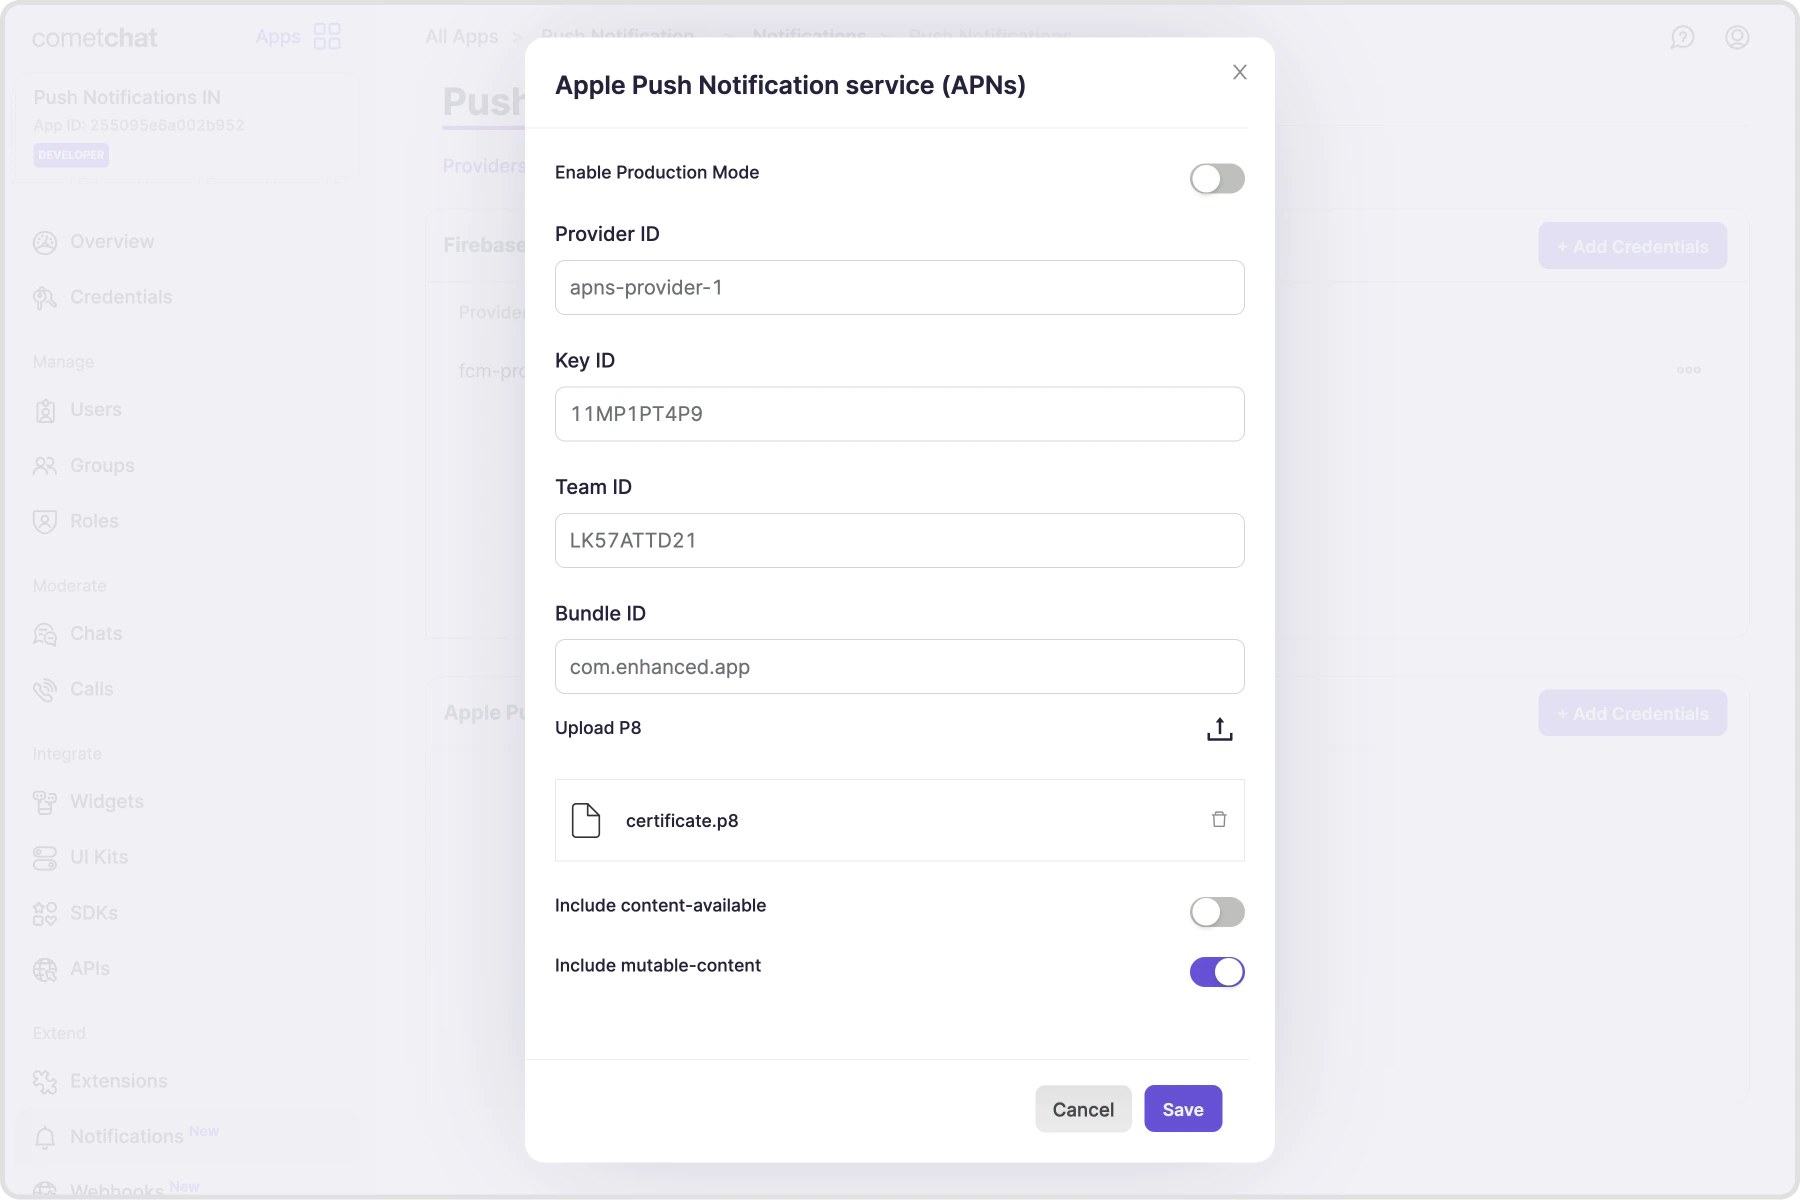
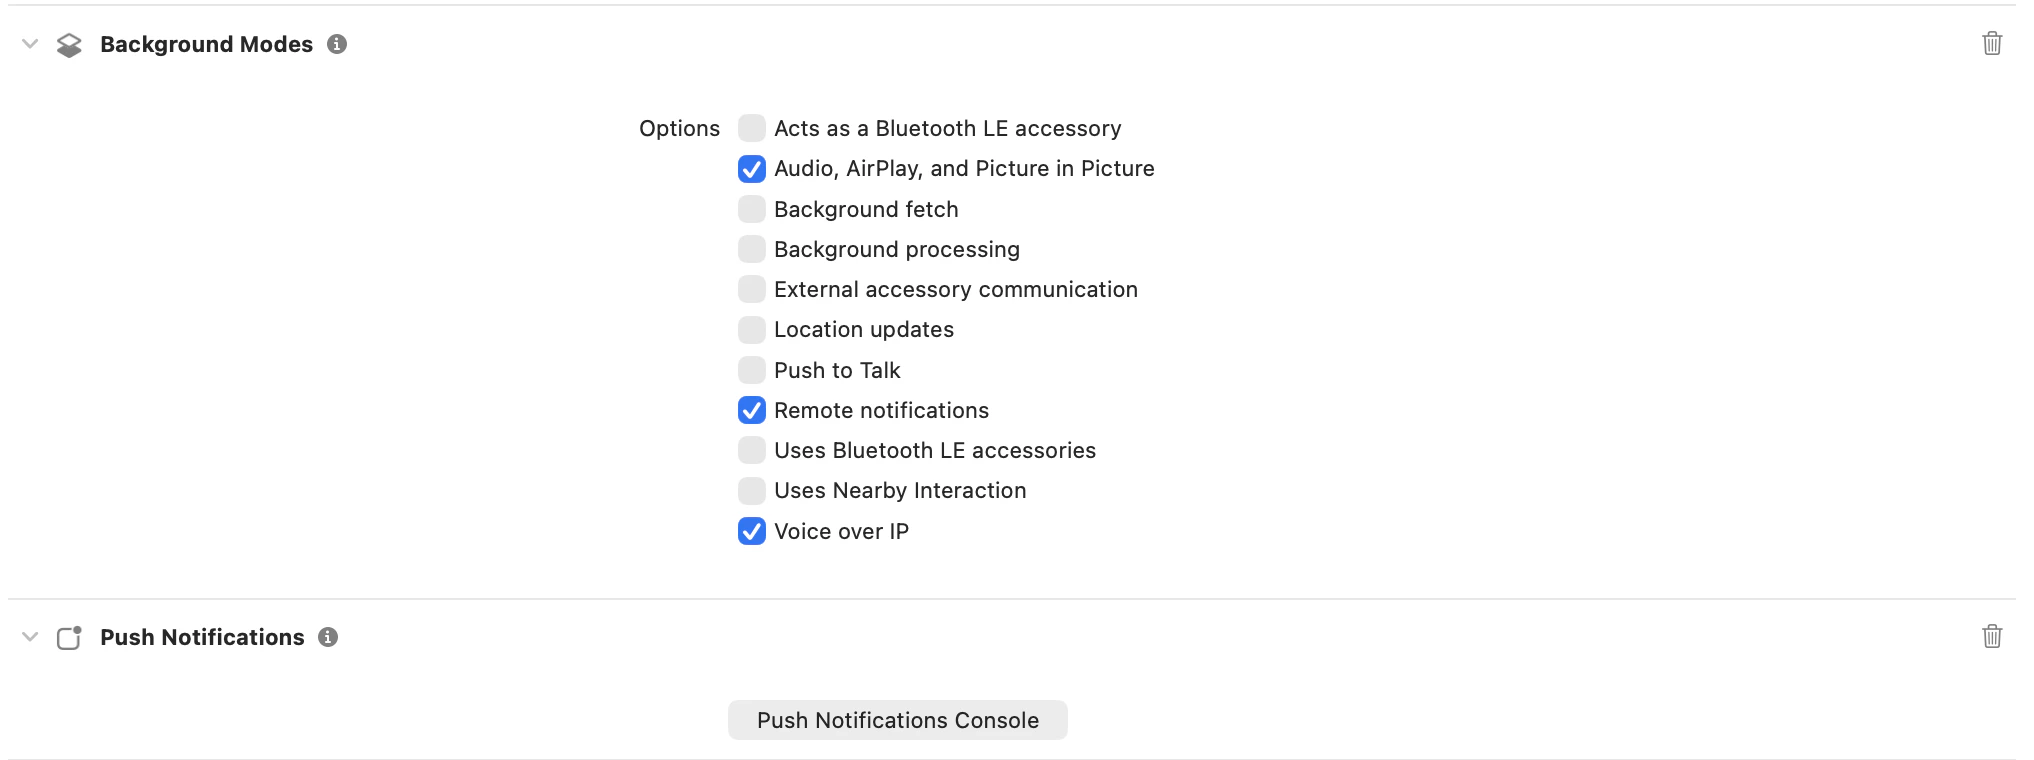
2. Apple setup
- Capabilities: Push Notifications, Background Modes → Remote notifications & Voice over IP, CallKit usage descriptions in
Info.plist(mic/camera). - APNs Auth Key: generate
.p8(or use cert), note Key ID, Team ID, and Bundle ID; upload to CometChat providers.
3. Wiring APNs + PushKit/CallKit
- From below code, copy
CometChatAPNsHelper.swift,CometChatPNHelper.swift, and the twoAppDelegateextensions (AppDelegate+PN.swiftandAppDelegate+VoIP.swift) into your project. - These files implement APNs + PushKit/CallKit handling, notification presentation, tap and quick-reply actions, and call management.
- Update bundle ID, team ID, and provider IDs (
AppConstants.PROVIDER_IDetc.). Keep thevoippush type.
- AppDelegate + PN.swift
- AppDelegate + VoIP.swift
- CometChatAPNsHelper.swift
- CometChatPNHelper.swift
- AppConstants.swift
import Foundation
import UIKit
import CometChatSDK
import CometChatUIKitSwift

extension AppDelegate: UNUserNotificationCenterDelegate {

    // MARK: - Foreground Notifications
    func userNotificationCenter(_ center: UNUserNotificationCenter, willPresent notification: UNNotification, withCompletionHandler completionHandler: @escaping (UNNotificationPresentationOptions) -> Void) {
        print("willPresent notification: \(notification.request.content.userInfo)")
        let userInfo = notification.request.content.userInfo

        if CometChatPNHelper.shouldPresentNotification(userInfo: userInfo) == false {
            print("Suppressing notification (user is in active chat)")
            completionHandler([])
            return
        }

        completionHandler([.banner, .badge, .sound])
    }

    // MARK: - Notification Tap/Interaction
    func userNotificationCenter(_ center: UNUserNotificationCenter, didReceive response: UNNotificationResponse, withCompletionHandler completionHandler: @escaping () -> Void) {

        let userInfo = response.notification.request.content.userInfo
        print("User tapped notification: \(userInfo)")

        if response.actionIdentifier == "REPLY_ACTION" {
            if let textResponse = response as? UNTextInputNotificationResponse {
                let userReply = textResponse.userText
                print("Quick reply: \(userReply)")
                CometChatPNHelper.handleQuickReplyActionOnNotification(userInfo: userInfo, text: userReply, completionHandler: completionHandler)
            }
            completionHandler()
            return
        }

        CometChatPNHelper.handleTapActionOnNotification(userInfo: userInfo, completionHandler: completionHandler)
    }

}
#if canImport(CometChatCallsSDK)

import Foundation
import PushKit
import CallKit
import AVFoundation
import CometChatSDK
import CometChatCallsSDK

extension AppDelegate: PKPushRegistryDelegate, CXProviderDelegate {

  // MARK: - VoIP Push Token Updates

  func pushRegistry(
      _ registry: PKPushRegistry,
      didUpdate pushCredentials: PKPushCredentials,
      for type: PKPushType
  ) {
      print("VoIP token updated for type: \(type.rawValue)")
      cometchatAPNsHelper.registerForVoIPCalls(pushCredentials: pushCredentials)
  }

  func pushRegistry(
      _ registry: PKPushRegistry,
      didInvalidatePushTokenFor type: PKPushType
  ) {
      print("VoIP push token invalidated for type: \(type.rawValue)")
      initializePushKit()
      refreshPushCredentials()
  }

  // MARK: - PushKit Setup

  func initializePushKit() {
      if pushRegistry == nil {
          let registry = PKPushRegistry(queue: DispatchQueue.main)
          registry.delegate = self
          registry.desiredPushTypes = [.voIP]
          pushRegistry = registry
          print("Push registry initialized")
      } else {
          print("Push registry already initialized")
      }
  }

  func refreshPushCredentials() {
      guard let registry = pushRegistry else {
          print("Push registry is nil")
          return
      }

      registry.desiredPushTypes = []
      registry.desiredPushTypes = [.voIP]
      print("VoIP token refreshed")
  }

  // MARK: - Incoming VoIP Push

  func pushRegistry(
      _ registry: PKPushRegistry,
      didReceiveIncomingPushWith payload: PKPushPayload,
      for type: PKPushType,
      completion: @escaping () -> Void
  ) {
      print("Incoming VoIP push received")
      let provider = cometchatAPNsHelper.didReceiveIncomingPushWith(payload: payload)
      provider?.setDelegate(self, queue: nil)
      completion()
  }

  // MARK: - CallKit Delegates

  func providerDidReset(_ provider: CXProvider) {
      print("CallKit provider did reset")
      cometchatAPNsHelper.onProviderDidReset(provider: provider)
  }

  func provider(_ provider: CXProvider, perform action: CXAnswerCallAction) {
      print("User answered call")

      // CRITICAL: Configure audio session BEFORE answering
      configureAudioSession()

      cometchatAPNsHelper.onAnswerCallAction(action: action)
  }

  func provider(_ provider: CXProvider, perform action: CXEndCallAction) {
      print("User ended call")
      cometchatAPNsHelper.onEndCallAction(action: action)
      action.fulfill()
  }

  func provider(_ provider: CXProvider, perform action: CXSetMutedCallAction) {
      print("User toggled mute: \(action.isMuted)")
      CometChatCalls.audioMuted(action.isMuted)
      action.fulfill()
  }

  // MARK: - CRITICAL: Audio Session Delegates (MISSING IN YOUR CODE)

  /// Called when CallKit activates the audio session
  func provider(_ provider: CXProvider, didActivate audioSession: AVAudioSession) {
      print("Audio session activated")

      // Configure audio session for VoIP
      configureAudioSession()

      // Removed CometChatCalls.startAudioSession() as per instructions
  }

  /// Called when CallKit deactivates the audio session
  func provider(_ provider: CXProvider, didDeactivate audioSession: AVAudioSession) {
      print("Audio session deactivated")

      // Removed CometChatCalls.stopAudioSession() as per instructions
  }

  // MARK: - Audio Session Configuration

  /// Configure AVAudioSession for VoIP calls
  private func configureAudioSession() {
      let audioSession = AVAudioSession.sharedInstance()

      do {
          // Set category for VoIP with speaker and bluetooth support
          try audioSession.setCategory(
              .playAndRecord,
              mode: .voiceChat,
              options: [.allowBluetooth, .allowBluetoothA2DP]
          )

          // Activate the session
          try audioSession.setActive(true)

          print("Audio session configured successfully")

      } catch {
          print("Failed to configure audio session: \(error.localizedDescription)")
      }
  }
}

#endif
import Foundation
import UIKit
import CometChatSDK
import CometChatUIKitSwift
import PushKit
import CallKit
import AVFAudio
#if canImport(CometChatCallsSDK)
import CometChatCallsSDK
#endif
class CometChatAPNsHelper {
var uuid: UUID?
var activeCall: Call?
var cancelCall: Bool = true
var onCall = true
var callController = CXCallController()
let voipRegistry = PKPushRegistry(queue: DispatchQueue.main)
var provider: CXProvider? = nil
// MARK: - Configure Push Notifications
public func configurePushNotification(application: UIApplication, delegate: AppDelegate) {
print("Configuring Push Notifications...")
let authOptions: UNAuthorizationOptions = [.alert, .badge, .sound]
UNUserNotificationCenter.current().requestAuthorization(
options: authOptions,
completionHandler: { granted, error in
print("Push notification authorization granted: \(granted)")
if let error = error {
print("Authorization error: \(error.localizedDescription)")
} else if granted {
print("User granted notification permissions")
// Register for remote notifications on main thread
DispatchQueue.main.async {
UIApplication.shared.registerForRemoteNotifications()
}
} else {
print("User denied notification permissions")
}
})
// Define the reply action
let replyAction = UNTextInputNotificationAction(
identifier: "REPLY_ACTION",
title: "Reply",
options: [],
textInputButtonTitle: "Send",
textInputPlaceholder: "Type your reply here"
)
// Define the notification category
let messageCategory = UNNotificationCategory(
identifier: "MESSAGE_CATEGORY",
actions: [replyAction],
intentIdentifiers: [],
options: []
)
// Register the category
UNUserNotificationCenter.current().setNotificationCategories([messageCategory])
// Add login listener
CometChat.addLoginListener("loginlistener-pnToken-register-login", self)
#if canImport(CometChatCallsSDK)
let voipRegistry: PKPushRegistry = PKPushRegistry(queue: DispatchQueue.main)
voipRegistry.delegate = (delegate as? PKPushRegistryDelegate)
voipRegistry.desiredPushTypes = [PKPushType.voIP]
CometChatCallEvents.addListener("loginlistener-pnToken-register-login", self)
#endif
}
// MARK: - Register APNs Token
public func registerTokenForPushNotification(deviceToken: Data) {
guard CometChat.getLoggedInUser() != nil else {
print("Cannot register token: User not logged in")
return
}
let hexString = deviceToken.map { String(format: "%02.2hhx", $0) }.joined()
UserDefaults.standard.set(hexString, forKey: "apnspuToken")
print("APNs token: \(hexString)")
CometChatNotifications.registerPushToken(
pushToken: hexString,
platform: CometChatNotifications.PushPlatforms.APNS_IOS_DEVICE,
providerId: AppConstants.PROVIDER_ID,
onSuccess: { success in
print("APNs token registered successfully: \(success)")
},
onError: { error in
print("APNs token registration failed: \(error.errorCode) - \(error.errorDescription)")
}
)
}
// MARK: - Register Pending Token (After Login)
private func registerPendingTokenIfNeeded() {
if let pendingToken = UserDefaults.standard.string(forKey: "pendingAPNsToken") {
print("Registering pending APNs token after login...")
if let tokenData = hexStringToData(pendingToken) {
registerTokenForPushNotification(deviceToken: tokenData)
UserDefaults.standard.removeObject(forKey: "pendingAPNsToken")
}
}
}
private func hexStringToData(_ string: String) -> Data? {
let len = string.count / 2
var data = Data(capacity: len)
for i in 0..<len {
let j = string.index(string.startIndex, offsetBy: i*2)
let k = string.index(j, offsetBy: 2)
let bytes = string[j..<k]
if var num = UInt8(bytes, radix: 16) {
data.append(&num, count: 1)
} else {
return nil
}
}
return data
}
// MARK: - VoIP Registration
public func registerForVoIPCalls(pushCredentials: PKPushCredentials) {
guard CometChat.getLoggedInUser() != nil else {
print("Cannot register VoIP token: User not logged in")
return
}
let deviceToken = pushCredentials.token.reduce("", {$0 + String(format: "%02X", $1) })
UserDefaults.standard.set(deviceToken, forKey: "voipToken")
print("VoIP token: \(deviceToken)")
CometChatNotifications.registerPushToken(
pushToken: deviceToken,
platform: CometChatNotifications.PushPlatforms.APNS_IOS_VOIP,
providerId: AppConstants.PROVIDER_ID,
onSuccess: { success in
print("VoIP token registered successfully: \(success)")
},
onError: { error in
print("VoIP token registration failed: \(error.errorCode) - \(error.errorDescription)")
}
)
}
// MARK: - Missed Call Notification
public func handleMissedCallNotification(payload: [AnyHashable: Any]) {
guard let senderName = payload["senderName"] as? String,
let senderAvatar = payload["senderAvatar"] as? String else {
print("Missing required payload fields for missed call")
return
}
let content = UNMutableNotificationContent()
if let avatarURL = URL(string: senderAvatar), let imageData = try? Data(contentsOf: avatarURL) {
do {
let fileManager = FileManager.default
let temporaryDirectory = URL(fileURLWithPath: NSTemporaryDirectory())
let fileURL = temporaryDirectory.appendingPathComponent("avatar.png")
try imageData.write(to: fileURL)
let attachment = try UNNotificationAttachment(identifier: "avatar", url: fileURL, options: nil)
content.attachments = [attachment]
} catch {
print("Error creating notification attachment: \(error.localizedDescription)")
}
}
content.title = "\(senderName)"
content.body = "Missed call"
content.sound = UNNotificationSound.default
let request = UNNotificationRequest(identifier: UUID().uuidString, content: content, trigger: nil)
UNUserNotificationCenter.current().add(request) { error in
if let error = error {
print("Error displaying missed call notification: \(error.localizedDescription)")
} else {
print("Missed call notification displayed")
}
}
}
func reloadViewController(_ rootViewController : UIViewController) {
if let navigationController = rootViewController as? UINavigationController {
if let visibleViewController = navigationController.visibleViewController {
visibleViewController.viewWillAppear(true)
visibleViewController.viewDidAppear(true)
}
} else {
rootViewController.viewWillAppear(true)
rootViewController.viewDidAppear(true)
}
}
// MARK: - Present Message From Payload
public func presentMessageFromPayload(response: UNNotificationResponse) {
let notification = response.notification.request.content.userInfo as? [String: Any]
if let userInfo = notification, let messageObject =
userInfo["message"], let dict = messageObject as? [String: Any] {
let message = CometChat.processMessage(dict).0
let cometChatMessages = MessagesVC()
if message?.receiverType == .user {
guard let uid = message?.senderUid, let userName = message?.sender?.name else { return }
let user = User(uid: uid, name: userName)
cometChatMessages.user = user
} else {
guard let group = (message?.receiver as? Group) else { return }
cometChatMessages.group = group
}
cometChatMessages.modalPresentationStyle = .fullScreen
let sceneDelegate = UIApplication.shared.connectedScenes.first?.delegate as? SceneDelegate
if let window = sceneDelegate?.window, let rootViewController = window.rootViewController {
var currentController = rootViewController
while let presentedController = currentController.presentedViewController {
currentController = presentedController
}
currentController.present(cometChatMessages, animated: true)
}
}
}
}
// MARK: - Login Token Handling
extension CometChatAPNsHelper: CometChatLoginDelegate {
func onLoginSuccess(user: CometChatSDK.User) {
print("User logged in successfully: \(user.uid ?? "unknown")")
// Register for APNs after login
DispatchQueue.main.async {
UIApplication.shared.registerForRemoteNotifications()
print("Requesting APNs token after login...")
}
// Check for pending token
registerPendingTokenIfNeeded()
#if canImport(CometChatCallsSDK)
DispatchQueue.main.asyncAfter(deadline: .now() + 2) {
if let appDelegate = UIApplication.shared.delegate as? AppDelegate {
let registry = PKPushRegistry(queue: DispatchQueue.main)
registry.delegate = appDelegate
appDelegate.pushRegistry(registry, didInvalidatePushTokenFor: .voIP)
}
}
#endif
}
func onLoginFailed(error: CometChatSDK.CometChatException?) {
print("Login failed: \(error?.errorDescription ?? "unknown error")")
}
func onLogoutSuccess() {
print("User logged out successfully")
}
func onLogoutFailed(error: CometChatSDK.CometChatException?) {
print("Logout failed: \(error?.errorDescription ?? "unknown error")")
}
}
// MARK: - VoIP & CallKit Functions
#if canImport(CometChatCallsSDK)
extension CometChatAPNsHelper {
public func didReceiveIncomingPushWith(payload: PKPushPayload) -> CXProvider? {
guard let sender = payload.dictionaryPayload["sender"] as? String,
let senderName = payload.dictionaryPayload["senderName"] as? String,
let body = payload.dictionaryPayload["body"] as? String,
let callAction = payload.dictionaryPayload["callAction"] as? String,
let receiver = payload.dictionaryPayload["receiver"] as? String,
let type = payload.dictionaryPayload["type"] as? String,
let callType = payload.dictionaryPayload["callType"] as? String,
let sessionId = payload.dictionaryPayload["sessionId"] as? String,
let conversationId = payload.dictionaryPayload["conversationId"] as? String else {
print("Incomplete VoIP payload")
return nil
}
let applicationState = UIApplication.shared.applicationState
print("VoIP push received - Action: \(callAction), State: \(applicationState.rawValue)")
if type == "call" {
switch callAction {
case "initiated":
switch applicationState {
case .active:
if CometChat.getActiveCall() != nil {
print("User already on a call, rejecting with busy...")
CometChat.rejectCall(sessionID: sessionId, status: .busy, onSuccess: { rejectedCall in
print("Rejected incoming call with busy status")
}, onError: { error in
print("Failed to reject with busy: \(error?.errorDescription ?? "")")
})
return nil
} else {
return updatedInitiateCall(sender: sender, senderName: senderName, body: body, callAction: callAction, receiver: receiver, callType: callType, sessionId: sessionId, conversationId: conversationId)
}
case .inactive, .background:
return updatedInitiateCall(sender: sender, senderName: senderName, body: body, callAction: callAction, receiver: receiver, callType: callType, sessionId: sessionId, conversationId: conversationId)
@unknown default:
break
}
case "ongoing":
print("Call ongoing")
break
case "unanswered":
provider?.reportCall(with: uuid!, endedAt: Date(), reason: .unanswered)
handleMissedCallNotification(payload: payload.dictionaryPayload)
case "rejected":
provider?.reportCall(with: uuid!, endedAt: Date(), reason: .unanswered)
case "busy":
if let uuid = uuid {
provider?.reportCall(with: uuid, endedAt: Date(), reason: .unanswered)
self.uuid = nil
}
case "cancelled":
provider?.reportCall(with: uuid!, endedAt: Date(), reason: .failed)
handleMissedCallNotification(payload: payload.dictionaryPayload)
case "ended":
provider?.reportCall(with: uuid!, endedAt: Date(), reason: .remoteEnded)
default:
provider?.reportCall(with: uuid!, endedAt: Date(), reason: .remoteEnded)
}
}
return nil
}
public func onAnswerCallAction(action: CXAnswerCallAction) {
if activeCall != nil {
startCall()
}
action.fulfill()
}
private func updatedInitiateCall(sender: String, senderName: String, body: String, callAction: String, receiver: String, callType: String, sessionId: String, conversationId: String) -> CXProvider? {
let callTypeValue: CometChat.CallType = callType == "audio" ? .audio : .video
let receiverType: CometChat.ReceiverType = conversationId.contains("group") ? .group : .user
let call = Call(receiverId: receiver, callType: callTypeValue, receiverType: receiverType)
call.sessionID = sessionId
call.callStatus = .initiated
call.initiatedAt = Date().timeIntervalSince1970
call.callInitiator = User(uid: sender, name: senderName)
call.callType = callTypeValue
call.callReceiver = User(uid: receiver, name: receiver)
activeCall = call
uuid = UUID()
let callerName = senderName
let config = CXProviderConfiguration(localizedName: "APNS + Callkit")
config.iconTemplateImageData = UIImage(named: "AppIcon")?.pngData()
config.includesCallsInRecents = true
config.ringtoneSound = "ringtone.caf"
config.supportsVideo = true
provider = CXProvider(configuration: config)
let update = CXCallUpdate()
update.remoteHandle = CXHandle(type: .generic, value: callerName.capitalized)
update.hasVideo = callType == "video"
provider?.reportNewIncomingCall(with: uuid!, update: update, completion: { error in
if error == nil {
self.configureAudioSession()
}
})
return provider!
}
private func configureAudioSession() {
do {
try AVAudioSession.sharedInstance().setCategory(AVAudioSession.Category.playAndRecord, options: [.mixWithOthers, .allowBluetooth, .defaultToSpeaker])
try AVAudioSession.sharedInstance().setActive(true)
} catch let error as NSError {
print("Audio session error: \(error)")
}
}
private func startCall() {
let cometChatOngoingCall = CometChatOngoingCall()
CometChat.acceptCall(sessionID: activeCall?.sessionID ?? "") { call in
DispatchQueue.main.async {
let isAudioCall = (self.activeCall?.callType == .audio)
var callSettingsBuilder = CometChatCallsSDK.CallSettingsBuilder()
callSettingsBuilder = callSettingsBuilder.setIsAudioOnly(isAudioCall)
cometChatOngoingCall.set(callSettingsBuilder: callSettingsBuilder)
cometChatOngoingCall.set(callWorkFlow: .defaultCalling)
cometChatOngoingCall.set(sessionId: call?.sessionID ?? "")
cometChatOngoingCall.modalPresentationStyle = .fullScreen
if let sceneDelegate = UIApplication.shared.connectedScenes.first?.delegate as? SceneDelegate,
let window = sceneDelegate.window,
let rootViewController = window.rootViewController {
var currentController = rootViewController
while let presentedController = currentController.presentedViewController {
currentController = presentedController
}
currentController.present(cometChatOngoingCall, animated: true)
}
}
cometChatOngoingCall.setOnCallEnded { [weak self] call in
DispatchQueue.main.async {
if let scene = UIApplication.shared.connectedScenes.first(where: { $0.activationState == .foregroundActive }) as? UIWindowScene {
if let rootViewController = scene.windows.first?.rootViewController {
self?.dismissCometChatIncomingCall(from: rootViewController)
self?.reloadViewController(rootViewController)
}
}
}
self?.provider?.reportCall(with: self?.uuid ?? UUID(), endedAt: Date(), reason: .remoteEnded)
}
} onError: { error in
print("Error accepting call: \(error?.errorDescription ?? "")")
}
}
func onCallEnded(call: CometChatSDK.Call) {
guard let uuid = uuid else { return }
if activeCall != nil {
let transaction = CXTransaction(action: CXEndCallAction(call: uuid))
callController.request(transaction, completion: { error in })
activeCall = nil
}
DispatchQueue.main.sync { [self] in
if let scene = UIApplication.shared.connectedScenes.first(where: { $0.activationState == .foregroundActive }) as? UIWindowScene {
if let rootViewController = scene.windows.first?.rootViewController {
dismissCometChatIncomingCall(from: rootViewController)
self.reloadViewController(rootViewController)
}
}
}
}
func onCallInitiated(call: CometChatSDK.Call) {
let callerName = (call.callReceiver as? User)?.name
callController = CXCallController()
uuid = UUID()
let transactionCallStart = CXTransaction(action: CXStartCallAction(call: uuid!, handle: CXHandle(type: .generic, value: callerName ?? "")))
callController.request(transactionCallStart, completion: { error in })
}
private func dismissCometChatIncomingCall(from viewController: UIViewController) {
if let presentedViewController = viewController.presentedViewController {
if presentedViewController is CometChatIncomingCall {
presentedViewController.dismiss(animated: false, completion: nil)
} else {
dismissCometChatIncomingCall(from: presentedViewController)
}
}
}
public func onProviderDidReset(provider: CXProvider) {
if let uuid = self.uuid {
onCall = true
provider.reportCall(with: uuid, endedAt: Date(), reason: .unanswered)
}
}
public func onEndCallAction(action: CXEndCallAction) {
let endCallAction = CXEndCallAction(call: uuid!)
let transaction = CXTransaction()
transaction.addAction(endCallAction)
callController.request(transaction) { error in
if let error = error {
print("Error requesting transaction: \(error)")
} else {
print("Requested transaction successfully")
}
}
if let activeCall = activeCall {
if CometChat.getActiveCall() == nil || (CometChat.getActiveCall()?.callStatus == .initiated && CometChat.getActiveCall()?.callInitiator != CometChat.getLoggedInUser()) {
CometChat.rejectCall(sessionID: activeCall.sessionID ?? "", status: .rejected, onSuccess: { [self] (rejectedCall) in
action.fulfill()
print("CallKit: Reject call success")
DispatchQueue.main.async { [self] in
if let scene = UIApplication.shared.connectedScenes.first(where: { $0.activationState == .foregroundActive }) as? UIWindowScene {
if let rootViewController = scene.windows.first?.rootViewController {
self.dismissCometChatIncomingCall(from: rootViewController)
self.reloadViewController(rootViewController)
}
}
if let uuid = uuid {
provider?.reportCall(with: uuid, endedAt: Date(), reason: .remoteEnded)
self.uuid = nil
}
}
}) { (error) in
print("CallKit: Reject call failed: \(error?.errorDescription ?? "")")
}
} else {
CometChat.endCall(sessionID: CometChat.getActiveCall()?.sessionID ?? "") { call in
CometChatCalls.endSession()
action.fulfill()
print("CallKit: End call success")
DispatchQueue.main.async { [self] in
if let scene = UIApplication.shared.connectedScenes.first(where: { $0.activationState == .foregroundActive }) as? UIWindowScene {
if let rootViewController = scene.windows.first?.rootViewController {
self.dismissCometChatIncomingCall(from: rootViewController)
self.reloadViewController(rootViewController)
}
}
}
} onError: { error in
print("CallKit: End call failed: \(error?.errorDescription ?? "")")
}
}
}
}
}
extension CometChatAPNsHelper: CometChatCallEventListener {
func ccCallEnded(call: Call) {
guard let uuid = uuid else { return }
if activeCall != nil {
let transactionCallAccepted = CXTransaction(action: CXEndCallAction(call: uuid))
callController.request(transactionCallAccepted, completion: { error in })
activeCall = nil
}
}
}
#endif
import Foundation
import UIKit
import CometChatSDK
import CometChatUIKitSwift

class CometChatPNHelper {

let cometchatAPNsHelper = CometChatAPNsHelper()
static var currentActiveUser: CometChatSDK.User?
static var currentActiveGroup: CometChatSDK.Group?

static func handleTapActionOnNotification(userInfo: [AnyHashable: Any], completionHandler: @escaping () -> Void) {
  guard let notificationType = userInfo["type"] as? String,
     let receiverType = userInfo["receiverType"] as? String else {
    print("Notification type or receiver type not found in payload")
    completionHandler()
    return
  }

  switch notificationType {
  case "chat":
    if receiverType == "user" {
      handleChatNotification(userInfo: userInfo)
    } else if receiverType == "group" {
      handleGroupChatNotification(userInfo: userInfo)
    } else {
      print("Invalid receiver type for chat notification")
    }

  case "call":
    if receiverType == "user" {
      handleChatNotification(userInfo: userInfo)
    } else if receiverType == "group" {
      handleGroupChatNotification(userInfo: userInfo)
    } else {
      print("Invalid receiver type for call notification")
    }

  default:
    navigateToDefaultScreen()
  }

  completionHandler()
}

static func handleQuickReplyActionOnNotification(userInfo: [AnyHashable: Any], text: String, completionHandler: @escaping () -> Void) {
  guard let notificationType = userInfo["type"] as? String,
     let receiverType = userInfo["receiverType"] as? String else {
    print("Notification type or receiver type not found in payload")
    completionHandler()
    return
  }

  switch notificationType {
  case "chat":
    if receiverType == "user" {
      replyToUserWith(message: text, userInfo: userInfo)
    } else if receiverType == "group" {
      replyToGroupWith(message: text, userInfo: userInfo)
    } else {
      print("Invalid receiver type for chat notification")
    }
  default:
    break
  }

  completionHandler()
}

static func navigateToViewController(_ viewController: UIViewController) {

  guard let window = UIApplication.shared.windows.first else {
    print("Window not found")
    return
  }

  if let navigationController = window.rootViewController as? UINavigationController {
    if let currentViewController = navigationController.viewControllers.last,
      currentViewController.description == viewController.description {
      print("Already in same view")
      return

    }
    navigationController.popViewController(animated: false)
    navigationController.pushViewController(viewController, animated: false)
  } else {
    print("Root view controller is not a UINavigationController")
  }

}

static func replyToUserWith(message text: String, userInfo: [AnyHashable: Any], withParentId: Int? = nil) {
  guard let sender = userInfo["sender"] as? String,
     let senderName = userInfo["senderName"] as? String else {
    print("Sender information missing in payload")
    return
  }

  let textMessage = TextMessage(receiverUid: sender, text: text, receiverType: .user)
  if let parentID = withParentId {
    textMessage.parentMessageId = parentID
  }
  CometChatUIKit.sendTextMessage(message: textMessage)
}

static func replyToGroupWith(message text: String, userInfo: [AnyHashable: Any], withParentId: Int? = nil) {
  guard let groupID = userInfo["receiver"] as? String,
     let groupName = userInfo["receiverName"] as? String else {
    print("Group information missing in payload")
    return
  }

  let textMessage = TextMessage(receiverUid: groupID, text: text, receiverType: .group)
  if let parentID = withParentId {
    textMessage.parentMessageId = parentID
  }
  CometChatUIKit.sendTextMessage(message: textMessage)
}

static func handleChatNotification(userInfo: [AnyHashable: Any]) {
  guard let sender = userInfo["sender"] as? String,
     let senderName = userInfo["senderName"] as? String else {
    print("Sender information missing in payload")
    return
  }

  let senderUser = User(uid: sender, name: senderName)
  senderUser.avatar = userInfo["senderAvatar"] as? String

  getUser(forUID: sender) { retrievedUser in
    DispatchQueue.main.async {
      if let user = retrievedUser {
        senderUser.status = user.status
      } else {
        print("Failed to retrieve user status")
      }

      let chatViewController = MessagesVC()
      chatViewController.user = retrievedUser
      self.navigateToViewController(chatViewController)
    }

  }
}


static func handleGroupChatNotification(userInfo: [AnyHashable: Any]) {
  guard let groupID = userInfo["receiver"] as? String,
     let groupName = userInfo["receiverName"] as? String else {
    print("Group information missing in payload")
    return
  }

  let groupUser = Group(guid: groupID, name: groupName, groupType: .private, password: nil)

  self.getGroup(for: groupUser, guid: groupID) { fetchedGroup in
    DispatchQueue.main.async {
      if let group = fetchedGroup {
        groupUser.membersCount = group.membersCount
        groupUser.icon = group.icon
      } else {
        print("Failed to fetch group members count")
      }
      let chatViewController = MessagesVC()
      chatViewController.group = fetchedGroup
      self.navigateToViewController(chatViewController)
    }
  }
}

static func handleCallNotification(userInfo: [AnyHashable: Any]) {
  guard let sender = userInfo["sender"] as? String,
     let senderName = userInfo["senderName"] as? String else {
    print("Sender information missing in payload")
    return
  }

  let user = User(uid: sender, name: senderName)
  user.avatar = userInfo["senderAvatar"] as? String
  DispatchQueue.main.async {
    let callViewController = MessagesVC()
    callViewController.user = user
    CometChatPNHelper.navigateToViewController(callViewController)
  }
}

static func handleGroupCallNotification(userInfo: [AnyHashable: Any]) {
  guard let groupID = userInfo["receiver"] as? String,
     let groupName = userInfo["receiverName"] as? String else {
    print("Group information missing in payload")
    return
  }

  let groupUser = Group(guid: groupID, name: groupName, groupType: .private, password: nil)
  groupUser.icon = userInfo["receiverAvatar"] as? String
  DispatchQueue.main.async {

    let callViewController = MessagesVC()
    callViewController.group = groupUser
    CometChatPNHelper.navigateToViewController(callViewController)
  }
}

static func navigateToDefaultScreen() {
  DispatchQueue.main.async {
    let defaultViewController = MessagesVC()

    guard let window = UIApplication.shared.windows.first else {
      print("Window not found")
      return
    }

    if let navigationController = window.rootViewController as? UINavigationController {
      navigationController.pushViewController(defaultViewController, animated: true)
    } else {
      print("Root view controller is not a UINavigationController")
    }
  }
}
static func getUser(forUID uid: String, completionHandler: @escaping (CometChatSDK.User?) -> Void) {
  CometChat.getUser(UID: uid, onSuccess: { user in
    let user = user
    completionHandler(user)
  }) { error in
    print("User fetching failed with error: \(error?.errorDescription ?? "Unknown error")")
    completionHandler(nil)
  }
}

static func getGroup(for group: Group, guid: String, completionHandler: @escaping (Group?) -> Void) {
  CometChat.getGroup(GUID: guid, onSuccess: { fetchedGroup in
    completionHandler(fetchedGroup)
  }) { error in
    print("Group details fetching failed with error: \(error?.errorDescription ?? "Unknown error")")
    completionHandler(nil)
  }
}

static func shouldPresentNotification(userInfo: [AnyHashable: Any]) -> Bool {
  guard let notificationType = userInfo["type"] as? String,
     let receiverType = userInfo["receiverType"] as? String else {
    return true
  }

  if notificationType == "chat" {
    if receiverType == "user" {
      let sender = userInfo["sender"] as? String
      if sender == CometChatPNHelper.currentActiveUser?.uid {
        return false
      }
    } else if receiverType == "group" {
      let receiver = userInfo["receiver"] as? String
      if receiver == CometChatPNHelper.currentActiveGroup?.guid {
        return false
      }
    }
  }

  return true
}
}
import Foundation
import UIKit

class AppConstants {
static var APP_ID: String = ""
static var AUTH_KEY: String = ""
static var REGION: String = ""
static var PROVIDER_ID: String = ""
}

extension AppConstants{
static func saveAppConstants(){
UserDefaults.standard.set(APP_ID, forKey: "appID")
UserDefaults.standard.set(AUTH_KEY, forKey: "authKey")
UserDefaults.standard.set(REGION, forKey: "region")
}

    static func retrieveAppConstants(){
        APP_ID = UserDefaults.standard.string(forKey: "appID") ?? AppConstants.APP_ID
        AUTH_KEY = UserDefaults.standard.string(forKey: "authKey") ?? AppConstants.AUTH_KEY
        REGION = UserDefaults.standard.string(forKey: "region") ?? AppConstants.REGION
    }

}
4. Register APNs device + VoIP tokens with CometChat
- In your
AppDelegate.swift, implement the following methods to handle APNs registration success and failure, and to register the device token with CometChat. - Make sure to import the necessary modules at the top of the file.
- Complete your
AppDelegate.swiftas shown below:
import UIKit
import PushKit
import CometChatSDK
import CometChatUIKitSwift

@main
class AppDelegate: UIResponder, UIApplicationDelegate {

    var window: UIWindow?
    var pushRegistry: PKPushRegistry?
    let cometchatAPNsHelper = CometChatAPNsHelper()
    func application(
        _ application: UIApplication,
        didFinishLaunchingWithOptions launchOptions: [UIApplication.LaunchOptionsKey: Any]?
    ) -> Bool {

        UNUserNotificationCenter.current().delegate = self

        cometchatAPNsHelper.configurePushNotification(application: application, delegate: self)

        // Initialize PushKit
        initializePushKit()

        return true
    }

    // MARK: - APNs Registration Success
    func application(_ application: UIApplication, didRegisterForRemoteNotificationsWithDeviceToken deviceToken: Data) {
        print("APNs Device token received!")

        if CometChat.getLoggedInUser() != nil {
            print("User is logged in, registering APNs token...")
            cometchatAPNsHelper.registerTokenForPushNotification(deviceToken: deviceToken)
        } else {
            print("User NOT logged in yet, will register token after login")
            // Store token for later registration
            let hexString = deviceToken.map { String(format: "%02.2hhx", $0) }.joined()
            UserDefaults.standard.set(hexString, forKey: "pendingAPNsToken")
        }
    }

    // MARK: - APNs Registration Failure
    func application(_ application: UIApplication, didFailToRegisterForRemoteNotificationsWithError error: Error) {
        print("Failed to register for APNs: \(error.localizedDescription)")
    }
}
5. Unregister the token on logout
Before logging the user out, unregister the push token so the device stops receiving notifications for that user.CometChatNotifications.unregisterPushToken(
onSuccess: { success in
print("Push token unregistered: \(success)")
CometChatUIKit.logout(onSuccess: { _ in
print("Logout successful")
}, onError: { error in
print("Logout failed: \(error.errorDescription)")
})
},
onError: { error in
print("Token unregister failed: \(error.errorCode) - \(error.errorDescription)")
}
)
CometChatNotifications.unregisterPushToken() before CometChatUIKit.logout(). If you skip this step, the device may continue to receive pushes for the logged-out user.
6. Badge count
CometChat’s Enhanced Push Notification payload includes anunreadMessageCount field (a string) representing the total unread messages across all conversations for the logged-in user. You can use this to set the app icon badge.
6.1 Enable unread badge count on the CometChat Dashboard
- Go to CometChat Dashboard → Notification Engine → Settings → Preferences → Push Notification Preferences.
- Scroll to the bottom and enable the Unread Badge Count toggle.
unreadMessageCount field in every push payload sent to your app.
6.2 Expected payload format
CometChat sends APNs payloads with this structure (relevant fields):{
"unreadMessageCount": "5",
"title": "New Message",
"alert": "John: Hello!",
"conversationId": "user_abc123",
"receiverType": "user"
}
unreadMessageCount is a string representing the total unread messages across all conversations for the logged-in user.
6.3 Update the app badge from the push payload
Inside yourUNUserNotificationCenterDelegate method (for example willPresent or a Notification Service Extension), parse unreadMessageCount and update the badge:
// Inside userNotificationCenter(_:willPresent:) or a Notification Service Extension
let userInfo = notification.request.content.userInfo

if let unreadCountStr = userInfo["unreadMessageCount"] as? String,
   let count = Int(unreadCountStr), count >= 0 {
    DispatchQueue.main.async {
        UIApplication.shared.applicationIconBadgeNumber = count
    }
} else {
    print("No valid unreadMessageCount in payload")
}
applicationIconBadgeNumber to 0 clears the badge.
6.4 Clear badge when the app opens
Clear the badge count when the app launches and every time it returns to the foreground. In yourSceneDelegate or AppDelegate:
func sceneDidBecomeActive(_ scene: UIScene) {
    UIApplication.shared.applicationIconBadgeNumber = 0
}
7. Navigation from notifications
When the user taps a notification, useuserNotificationCenter(_:didReceive:withCompletionHandler:) to extract conversation details and navigate to the correct screen.
func userNotificationCenter(
    _ center: UNUserNotificationCenter,
    didReceive response: UNNotificationResponse,
    withCompletionHandler completionHandler: @escaping () -> Void
) {
    let userInfo = response.notification.request.content.userInfo

    guard let receiverType = userInfo["receiverType"] as? String else {
        completionHandler()
        return
    }

    if receiverType == "user" {
        guard let senderUid = userInfo["sender"] as? String,
              let senderName = userInfo["senderName"] as? String else {
            completionHandler()
            return
        }
        let user = User(uid: senderUid, name: senderName)
        let messagesVC = MessagesVC()
        messagesVC.user = user
        navigateToViewController(messagesVC)

    } else if receiverType == "group" {
        guard let groupId = userInfo["receiver"] as? String,
              let groupName = userInfo["receiverName"] as? String else {
            completionHandler()
            return
        }
        let group = Group(guid: groupId, name: groupName, groupType: .public, password: nil)
        let messagesVC = MessagesVC()
        messagesVC.group = group
        navigateToViewController(messagesVC)
    }

    completionHandler()
}
navigateToViewController helper (shown in CometChatPNHelper.swift above) pushes the MessagesVC onto the navigation stack. Ensure the root view controller is ready before navigation — if the app was terminated, wait until login completes before routing.
8. Testing checklist
- Install on a device; grant notification permission. Verify APNs device token logs.
- Log in, then confirm both device + VoIP tokens register with CometChat (success callbacks).
- Send a message from another user:
- Foreground: ensure
willPresentshows your chosen presentation. - Background/terminated: tapping opens the correct conversation.
- Foreground: ensure
- Trigger an incoming call; CallKit UI should show caller info. Accept should join the call; Decline should reject via CometChat and end CallKit.
- Rotate tokens (reinstall or toggle VoIP) to ensure re-registration works.
6. Troubleshooting
| Symptom | Quick checks |
|---|---|
| No pushes | Entitlements set, APNs provider creds correct, bundle ID matches dashboard, permission granted. |
| Token registration fails | Run after login; provider IDs correct for device vs VoIP. |
| Taps do nothing | Verify notification center delegate and navigation readiness before routing. |
| Call UI missing | Ensure PushKit delegate fires, CallKit capabilities enabled, VoIP provider ID set. |
| Audio errors | Configure AVAudioSession for playAndRecord when reporting/accepting calls. |
| Badge count not showing | Verify Unread Badge Count is enabled in CometChat Dashboard and that your app reads unreadMessageCount from the payload. |
| Notification tap does not navigate | Ensure UNUserNotificationCenterDelegate is set, payload contains receiverType/sender/receiver, and root view controller is ready. |